

Focus: Audio Quality and Livestreaming
By Pouya Hamidi & Matthew Fava
Contents
Introduction
As we are writing this post we are entering the second month of quarantine and confronting projections that large gatherings for live music may not return for some time—an ominous scenario for our communities. The sudden and necessary prevalence of live-streamed performances takes on greater significance as we imagine a near future of connecting with remote audiences.
Given the conditions of isolation, there is an expectation during current live-streamed performances that the artist serve simultaneously as technician and performer. At the same time, the audience members experiencing a wider selection of live performances quickly realize that the myriad solutions for live-streaming (and the equipment or applications that are readily available) do not guarantee the best quality of audio.
When the CMC began implementing live-stream infrastructure several years ago, we connected with the co-author for this post, Pouya Hamidi. Pouya is a Toronto-based composer, musician, and audio engineer, and he has been a recurring presence in our Toronto venue for live and recorded sound. He is also the person we consult with when costing equipment and software for live audio. Pouya, like many great audio engineers, blends artistic and technical sensitivities.
In the last month we have gotten a lot (a lot) of inquiries about livestreaming, so we figured this post would be a helpful resource for artists planning solo livestream performances from home—many of the principles can also apply to more ambitious programming in future when ensembles/bands can gather together. Below you will find several headings as we outline the steps and costs that help us improve audio quality, minimize troubleshooting at the point that we go live, and make the experience for audiences/communities that much greater.
We’ve simplified this guide, but encourage you to reach out with feedback, or questions.
Let’s Review Some Basics
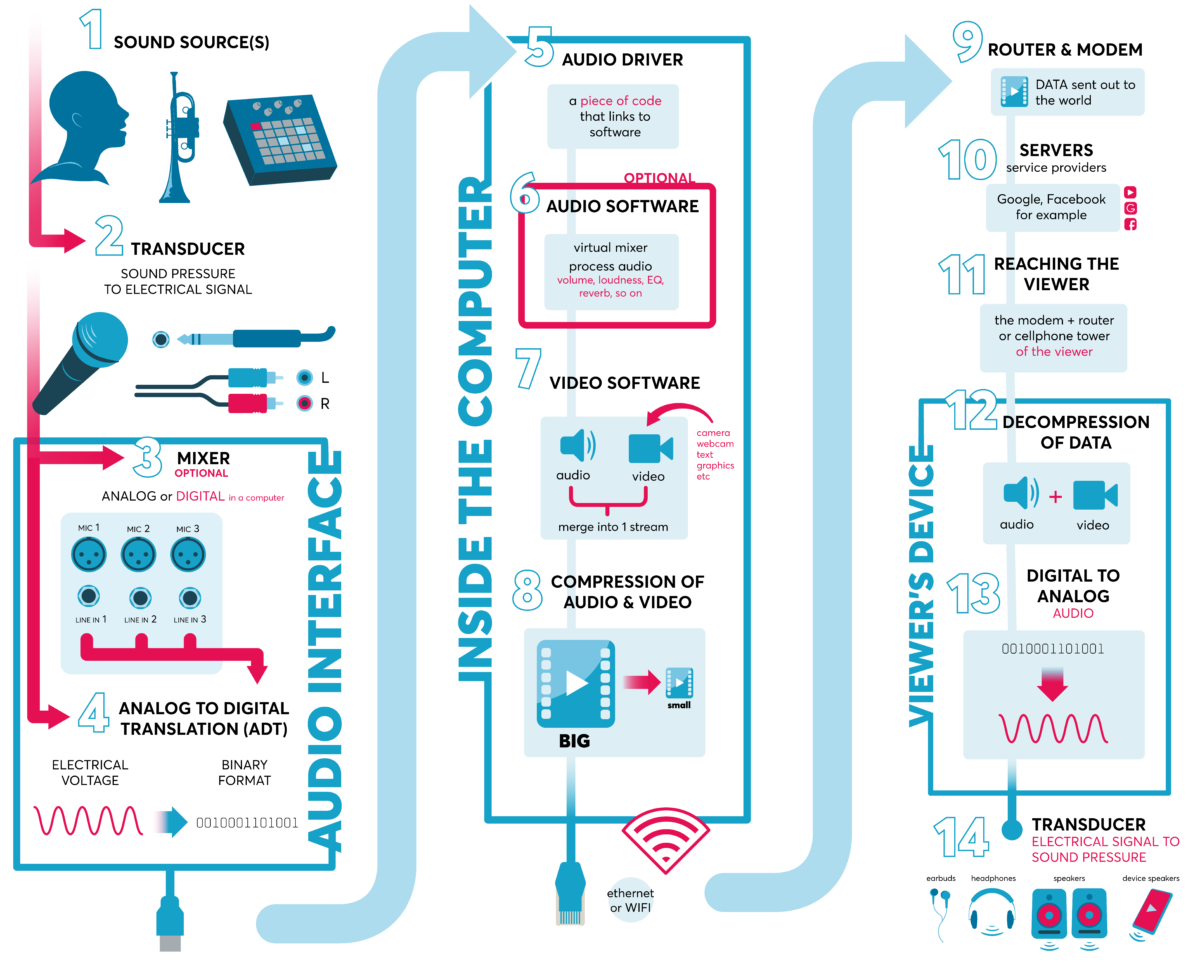
In order to improve the quality of live streaming audio, it is important to go over the path sound takes from the musician’s instrument to the viewer’s ear. Understanding these steps will not only help guide the musician to generate better audio quality but also help with troubleshooting their systems to identify challenges or make improvements. We have created an illustration (Media 1) and description for each step below. You can click on each number to expand it.
This is where the sound gets generated by the musicians. There are two ways this can occur: acoustic and electronic.
In simple terms acoustic sound sources are created when molecules vibrate in a medium such as air. Examples include singing or playing an acoustic instrument such as the trumpet. Electronic sound sources are ones that generate sound electronically and use the medium of electricity. Examples include: drum machine, synthesizers, electric keyboard. These electrical sound sources can be connected to speakers or amps and this turns them into acoustic sound sources as they begin moving air molecules to produce sound.
A transducer is a device that transforms one form of energy to another. In this case we are taking sound that exists in the medium of air and converting the air movements (acoustic sound waves) to an electrical signal with a device called the microphone. This new electrical signal is measured in electrical units such as voltages and currents. This step is skipped when the source is electronic as they already output an electronic signal.
A dedicated article (or book!) can be written about microphones but below are some important principles to consider for the purposes of this article:
- Types: there are three main types of microphones: condenser, dynamic, and ribbon. The way they capture sound uses different electronic circuit designs. Condensers require DC power to operate. This is transmitted to them via the microphone cable. It is commonly referred to as 48-volts or phantom power.
- Polar patterns: When sound arrives at different angles in relation to the front of the microphone, it captures sound at different levels (Media 2, directly below). The spatial sensitivity of the microphone in relation to its surroundings is measured in polar patterns. This is one of the reasons placement of microphones is important to the timbral qualities of the sound. If a microphones is not sensitive to sound sources placed on its rear, those rear sources will sound softer. This characteristic, when used correctly, helps the musician differentiate sound sources from each other and also emphasize ones to their liking. The polar pattern for most microphones is fixed (cannot be changed) but some have physical switches on them that allow the selection of different patterns depending on the application. Here are the main patterns:
- Omnidirectional: sound is capture all around the microphone
- Cardioid: sound is captured mostly from the front of the microphone
- Bi-directional (figure-8): sound is captured from front and back of the microphone but not the sides.

- Frequency response: frequency response of a microphone is a chart that shows the sensitivity of the microphone capturing all frequencies heard by the human ear from low (20hz) to high (20khz). Sound is generally measured in amplitude with the unit decibels (dB) and frequencies measured in hertz (Hz). Media 31 shows the frequency response of a popular microphone called the Shure SM58. We see that this microphone is good at capturing sounds that are higher than 100Hz but anything lower than 100Hz will sound softer. Therefore this microphone is preferred for recording instruments such as the voice that generates sound above 100Hz. Media 42 shows the frequency response of the internal microphone of various iPhones. We see that over 10kHz there are drops and also the curve diminishes below 60kHz. Media 53 shows the frequency response of a high end DPA 4006 microphone which is almost flat. Generally a flat curve with no peaks or valleys is preferable in using a microphone because it can capture the sound evenly from very low to very high frequencies.

Media 3: frequency response of the Shure SM58

Media 4: frequency response of the iPhone

Media 5: frequency response of the DPA 4006A
Of course there are other specifications (self-noise, transient response, dynamic range) that affect the tone (and price!) of a microphone but for the purposes of this article we will not get into them.
As explained above, what microphone model is used has an impact on the quality of sound. Another often overlooked principle in capturing good sound is how a microphones is used. The frequency response of the microphone changes as sound moves around the sound source. Also, a sound source produces different frequency responses at different angles—media 6 illustrates this for the trumpet. By moving the microphone around, one can change the tone of the capture. It is a good idea to look at common microphone placement techniques used for specific instruments—there are many books available. However, it is as important for the musicians to use their ears and sample different microphone positions until they hear a good placement. Actively listening to other sonic examples and recordings gives perspective on how an instrument can sound.

Media 6: The different ways the sound radiates from the trumpet.
The proximity or distance of the microphone to the sound source can also improve sound quality. The closer one gets to the sound source its placement becomes even more critical. This is supported by principles of physics in sound. For further investigation you can look at these concepts: inverse square law and sound reflections.
After the microphone, a device called the microphone preamplifier should be used to boost its level so that the devices that will be used for mixing sound after initial audio capture can function properly. For example, a dynamic microphone output is generally somewhere between 1 to 100 microvolts. A microphone preamplifier boosts this up to 10 volts (line-level) so that it can be used efficiently. In the practical section of this article we discuss setting the correct preamplifier values for audio streaming. A mic pre (as it often is referred to) is usually bundled with an audio interface, mixer, or portable recorder.
What about USB microphones?
USB microphones simply combine all of the processes of microphone preamplification, and analog-to digital conversion (ADC), into one device. This makes them an ideal solution for podcasters or radio hosts where one microphone is all they need. However, they complicate adding more microphones to your mix, and their USB cable length is limited and cannot be easily extended.
If you are a musician playing multiple instruments, you can connect the different outputs of each instrument into the inputs of a device called a mixer. The mixer does numerous functions but at its core it sums the different inputs (called channels) from different instruments into two channels (stereo) to be sent to the viewers. It is also capable of changing the volume for each channel so that no instrument overpowers the other. Depending on the mixer, one can also manipulate the sound with different effects such as equalization, compression, reverb, and delay.
A mixer can exist in the real world as a hardware box or in the virtual world inside the computer. They use the same concepts and mimic each other’s design however one important difference is worth noting here: displaying the strength of audio signals with their metering. You can refer to the “How to Read Audio Meters” text box for further explanation.
How to read audio meters
Just like a pilot who needs to know how high they are flying in relation to the ground, the engineer (or musician in the current context) needs to pay attention to the recording levels to get the optimal sound—and avoid crashing! You may have seen audio meters on sound equipment with labels such as dB, dBFS, dBu, VU, dBv, but what does it all mean?
First, it is important to understand that any audio system operates best within a sweet spot of a signal it receives. If the audio is too low, it will be noisy and if it is too high, it will sound distorted and lose part of the audio signal (also called “clipped”). dB, an abbreviation of decibel, is the general unit used to measure the incoming audio level. There are two main domains of audio systems: analog and digital. They both operate differently. In analog, audio signals are measured by their voltage (dBu or dBv). It is sometimes indicated as VU as well. In the digital world audio signals are measured digitally (zero and ones) relative to the maximum full scale (fs) the system can handle (dBFS). Media 74 shows the correlation between these systems when they are working together.
The number zero means different things in the two systems. Zero in the analog world (dBu or VU) is the optimal level music should be recorded at but zero in the digital system (dBfs) needs to be avoided and is the absolute limit. Anything past the number zero in dBfs creates distortion and clipping, and damages the sound. In both systems, audio meters are designed to show the colour red if the audio signal is too high and indicate that the signal would need to be turned down. The practical section of this article will help with setting correct levels.

Media 7: how analog and digital metering relate to each other. As an example, the meter display inside a Zoom Recorder is digital since the zero is at the far right side.
Different Audio Hardware Signal Levels
The inputs and outputs on hardware equipment (mixers, interfaces) accept different audio signal strengths. It is important to connect audio cables to the right inputs. These are labeled on the equipment or mentioned in the user manual of devices. In the context of this article, here are three types to look for:
- Microphone level: this is the level that comes out of microphones, often indicated by an XLR input on the device
- Instrument level: this is the audio level coming out of instruments that have a pickup such as electric guitars and guitar pedals. These are often indicated by Hi-Z and a ¼ input on the device
- Line level: this is the level that devices such as audio mixers, speakers, synthesizers, televisions, CD Players, and others use.
In order for the computer to understand microphones and other electronic sound sources (such as synthesizers) the audio needs to be converted into the digital domain. Computers speak a binary language consisting of ones and zeros. This process can be handled by hardware such as a sound-card, audio card, or audio interface which acts as the analog-to digital converter (ADC). There are internal sound-cards that exist inside a computer or smart device (cellphone) and there are external sound-cards that can be connected to a computer or smart device using a cable (most commonly USB).
An audio driver is the piece of software that connects the audio interface (sound-card) to the operating system of the computer.
Some audio interfaces do not require installation of the audio driver and one can simply use them by plugging them in. They are called “Plug and Play” or “class compliant”. However some interfaces require the user to download this software from the manufacturer’s website. To find out what your audio interface requires, you can consult its user manual—if you rent interfaces, you might go through this process with each model.
It is important to select which audio device will be used as more than one audio interface can be connected to a computer. Media 8 shows this selection menu in Chrome.

Media 8: different sound drivers available on the same computer
You may choose to use audio software to manipulate the sound before merging it with the video to send it out to the livestream audience—this is an optional stage. As mentioned earlier, sound manipulation can occur outside of the computer using a mixer or inside the computer. You should be aware of your computer’s resources as this step can be taxing on the processing power of the computer. You want there to be enough computer power remaining for the next stage, the streaming itself.

An example of audio software (Pro Tools) with a virtual (digital) mixer.
This is where audio and video merge together to become one. This can occur in a web browser, with relative ease, when you go live on Facebook or YouTube. Alternately, you can make use of more elaborate software solutions such as Open Broadcaster Software (Media 95) or StreamLabs, where text, sounds, and other media can be added to the stream.

Media 9: Open Broadcaster Software (OBS) when different visual and sonic elements can be added to a video stream
Before audio and video is sent over to streaming platforms like YouTube, Facebook, and Twitch, it needs to get compressed—uncompressed audio and video is too large to send over the internet. Compression is the process of making the transmitted data smaller in its digital size while trying to maintain as much clarity and quality in the media. This removes some data while leaving critical content intact.
Compression is measured in bitrate which is the rate at which data is transmitted. The higher the value of the bitrate the better the streaming quality but also bigger the file size.
There are different codecs (standards) used both in audio and video to compress data. Over the years lots of research has been conducted to improve the perceived audio quality of these formats. Most often, the codec will be selected automatically based on the platform that you are using. If you have the ability to select a codec, you can research and select the best sounding option!
When livestreaming audio, it is important to have a fast internet connection and ideally use wired instead of wireless (wifi) connectors. Computers and smart devices connect to a modem and a router before being sent out into the world. Some of these devices get configured to limit the speed or prioritize certain applications (QoS) over others. It is critical to test your system before livestreaming to determine any connectivity issues on the network—if you are streaming to Facebook or Youtube, you can create a private event that you ask some friends to join live, or that you monitor and rewatch afterwards. Also there are free internet speed tools where you can test the download and upload speed. Here is commonly used speed test.
We mention in the conclusion but will quickly add here that you should feel empowered to ask a concert presenter or festival that is presenting your performance to cover the cost of improving your home internet (in particular, securing a higher upload speed if it is required).
The data for your stream is sent to the platform’s data centres around the world and it gets disseminated globally. This step accounts for the inherent delay (or latency) from the content creator to the viewer. It is quite incredible that broadcasting technology internationally exists now to be accessed by the average consumer. Some examples of popular platforms are: YouTube, Facebook, Twitch, and Instagram. One or another platform might make the most sense for you based on where you see the greatest engagement from your followers—it is worth pointing out that there is a higher chance of folks rewatching videos that are archived on Youtube as opposed to Facebook.
The reverse process of internet transmission occurs on the viewer’s end. A viewing device connects to a router or cellphone tower. It is not as critical to use wired or wireless connection on the viewer’s side because a lot of livestreaming platforms adjust to the speed of the viewer by degrading the quality while continuing the streaming process.
The reverse process of compression of video and audio content occurs on the viewer’s end. This requires a computer or smart phone’s computing resources. However, almost all devices sold now can handle this usage.
The digital sound from the video is sent to the digital-to-analog converter (DAC) electronic circuitry of the viewer’s device so that it can be converted to electrical signal that the viewer’s speaker, earbud, or headphone understands.
A transducer is a device that transforms one form of energy into another. Similar to how a microphone transforms air pressure energy into an electrical signal, the reverse process occurs when using speakers or headphones. The electrical energy transforms into movement of air molecules which many of us can hear with our ears.
It is important to note that the viewer’s playback device colours the sound. This means that the tonal characteristics of what they hear from one type of speaker differs from another—the same principle applies with headphones. Generally cellphone or laptop speakers cannot reproduce bass frequencies and certain other details because of their small size. This is why we encourage your viewers to use headphones or larger speakers when possible while listening to your music: they will hear a lot more of the music and feel more of the emotion of your performance.
A Practical Guide
Now that we have looked at the various stages of your audio signal when streaming to the world, we thought it might be helpful to go through the different approaches you might consider when setting up your audio at home. We’ll then take one of these approaches and create a hypothetical scenario and walk you through the steps.
Different Approaches
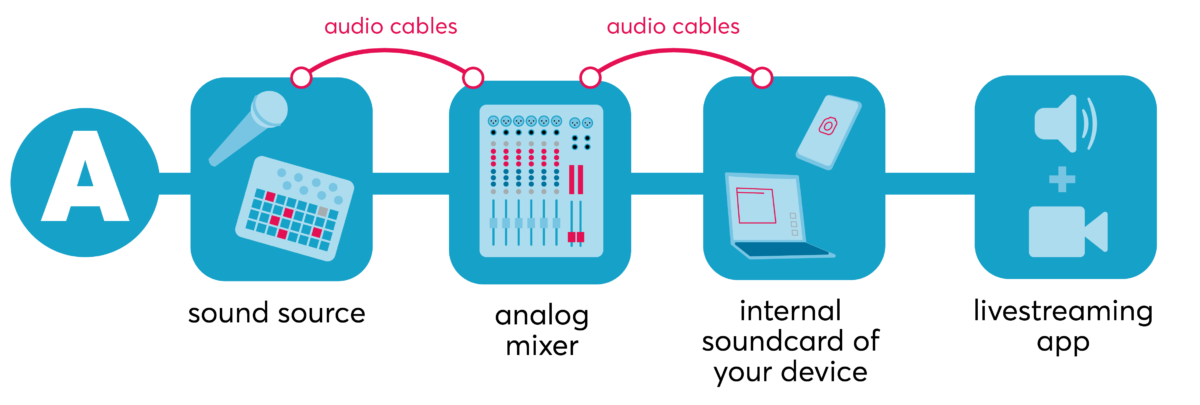
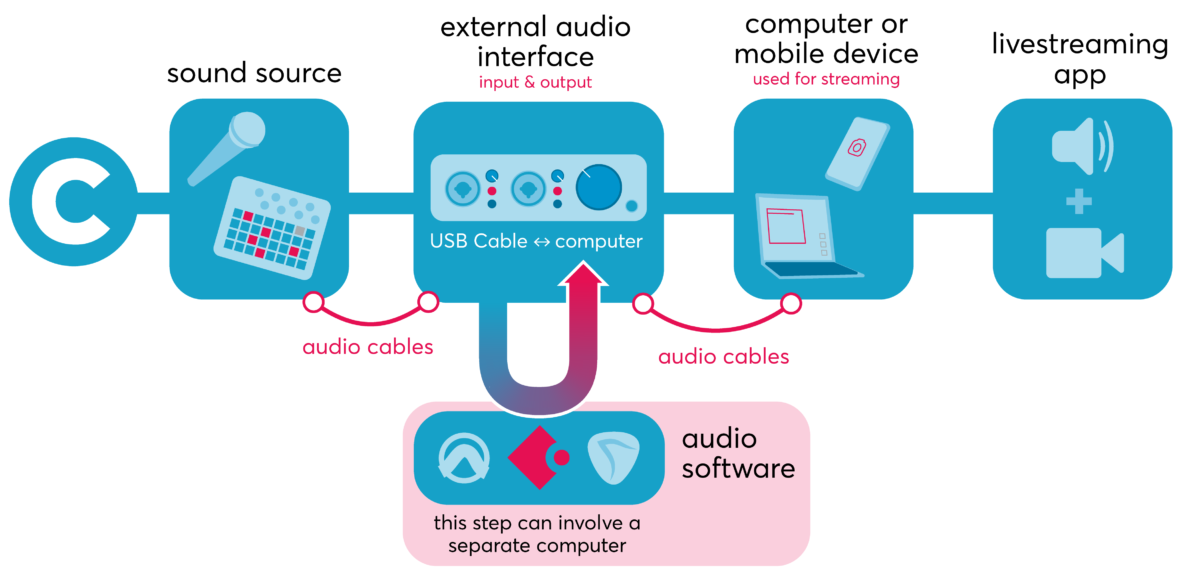
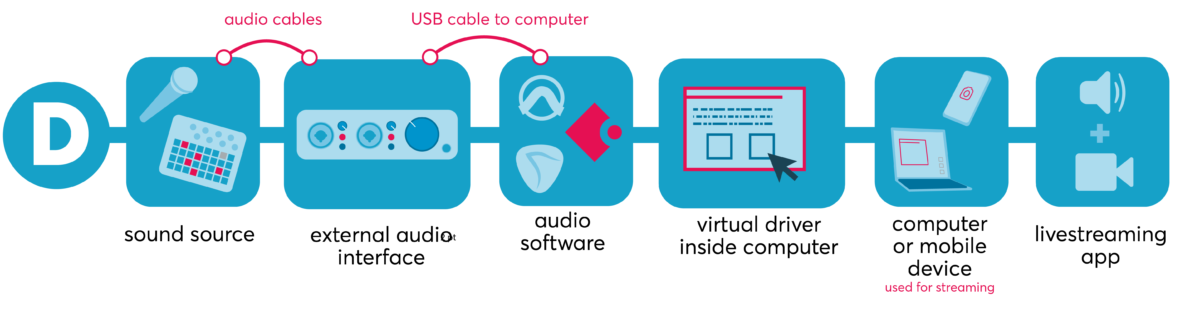
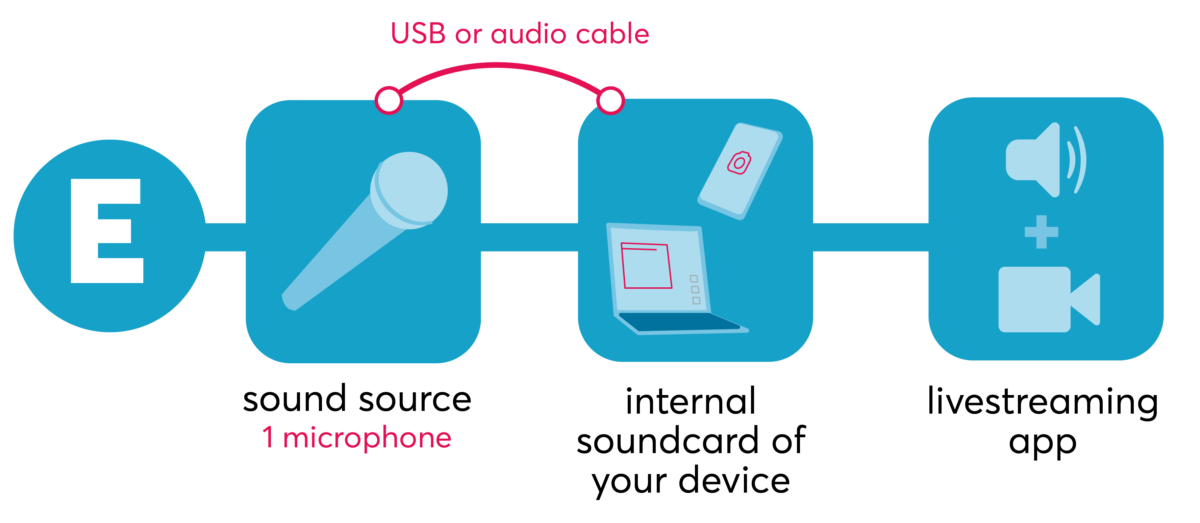
We will explore some options of connecting different audio components together below. You will notice that there are some similarities between some methods.
A quick gear/software disclaimer: we do not favour one manufacturer over the other in this article. We are simply suggesting examples so the reader can familiarize themselves with some options in each method. We also have received multiple requests for equipment and software recommendations, and thus want to anticipate some of your inquiries. Please read online reviews, research, and familiarize yourself with their features/complexities before acquiring them. And as always, look into options for renting or borrowing!
A Step by Step Example
Below we’ll walk you through steps needed to create a higher quality audio setup (relative to using the internal microphones of your computer or portable device) for live streaming.
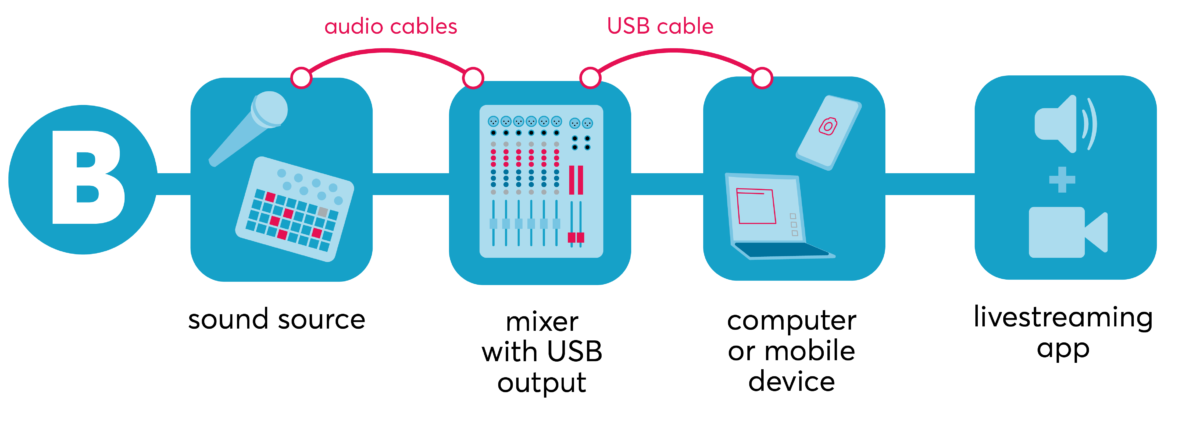
We’ll take a hypothetical example of a musician who plays flute, a synthesizer, and drum machine all at the same time. They are presenting an online concert for their fans. As illustrated above, other approaches are possible but we’ll use Method B. We’ll be using the mixer Zoom L-8 which has a USB connector.
Gear used in this example:
- Cardioid microphone: Audio-Technica AT2020
- Headphone: Audio-Technica ATH-M50
- Mixer: Zoom L-8
- Cables: one microphone XLR cable, multiple TRS cables
- Live-streaming software: Open Broadcaster Software
To begin, connect a cardioid microphone (AT2020) with a microphone XLR cable to the Zoom L-8’s first audio channel. This will be used to capture the flute. It is good to use a cardioid pattern in this situation because it can focus on the sound of the flute and not the other sounds in the room. If you are looking for an all-round microphone, we recommend a large diaphragm condenser microphone as opposed to a dynamic one. The large diaphragm condenser can capture more details and diverse sound sources. If the microphone is a condenser microphone, make sure that the phantom power button (also called 48v) is enabled on the mixer (Media 10).
Next, connect the synthesizer using one cable (or two if it is stereo) to the other channels of the mixer (Zoom L-8). Repeat this step for the drum machine.
Use a USB cable to connect the Zoom L-8 to the computer. For some devices such as the Zoom L-8 you’ll need to turn on the “audio interface” mode using the hardware’s menu system so that the computer recognizes the mixer as an audio device. At this point, make sure the computer recognizes the device. If the computer does not see the audio driver, you will need to download the relevant files from the manufacturer’s website.
Connect your headphones to the headphone output of the mixer. We highly recommend using headphones as opposed to speakers when doing a live-stream because it will:
- allow you to monitor yourself and will reveal how you are sounding through the microphones, which can inform adjustments to volume, effects, and microphone placement as needed.
- minimize the sound leakage (known also as bleed) from the speakers into the microphones
- avoid possible feedback (ouch!) that can result when running both microphones and speakers at the same time in the same room.
Alternatively you can have a roommate, family member, or other person living with you to monitor how you are sounding as well—if you are used to live acoustic performance, the experience in headphones might be disorienting.

Media 10: connecting all the bits and pieces on a Zoom L-8
Turn on your computer and launch Open Broadcaster Software (OBS). In the Audio settings select the Zoom L-8 as your default audio device. In the case of Zoom L-8 you do not need to install additional software as it is a class-compliant device. You may need to install additional software related to your mixer or restart the computer if you do not see it as an option in the audio settings of OBS.
Within OBS, set your Sample Rate to 48 kHz and Channels to Stereo. The reason that 48kHz is preferred is related to the theory behind audio in the digital domain which is beyond the scope of this article. For further reading you can visit the section on 48000khz on sampling (signal processing) Wikipedia article.

Media 11: OBS’s audio settings dialog box in settings
As discussed before, setting the right levels is an important part of getting a higher quality sound for livestreaming (media 126). The order in which these levels are set is also important. This is called gain staging or the gain structure. If the level at the input stage is set too low and then brought up in the headphones later, you will perceive loudness in the headphones but the signal will sound noisy or grainy. The reverse is also true: if the levels are set too high at the beginning, where the microphone is plugged in for example, and clipping occurs (going into the red colours in your metering) the sound will be distorted even if the headphone knob is turned down.

Media 12: why setting the right levels in audio is important
Ok. Here is how we will set the levels and do our gain staging. Always start from the sound source and follow the signal path. We’ve created letters to correspond to Media 13.
- Put the volume faders (A) at zero (that is indicated on the left of the fader, NOT right [G]).
- Slowly bring up the GAIN knob (B) while playing the loudest part of the music you are going to perform. This is the microphone preamplifier component of the Zoom L-8.
- Pay attention to the meter lights (C) on that specific channel. Adjust the GAIN knob (B) so that the loudest sound does not activate the red lights. The optimal meter would be to light up one or two of the orange lights. Remember that we do not want the levels to reach zero (D) (that is on the RIGHT side of the fader).
- Follow this step for the other instruments and inputs—in our example this includes the synthesizer and drum machine. Make sure the volume faders (A) are left at zero value (G).
- Next, go to the master fader (E) and make sure it is set to zero (G) as well.
- Put on your headphones and slowly turn up the volume knob for the headphone (F) so that it is a comfortable listening volume for you. Then play all of the instruments together and adjust the volume faders (A) so that it sounds balanced and no instrument overpowers another.
- Again, look at the master fader (E) and make sure the meters do not reach the red coloured lights when playing the loudest section of the music, and when all of the instruments are played together.
- Next, we’ll have to follow the audio signal to the inside of the computer. Inside OBS locate the Audio Mixer section (Media 14). When playing your loud passages you should be able to see the levels light up without going any higher than -6dBfs. Digital metering is measured from negative infinity (off) with negative numbers rising all the way to zero being the absolute highest level (as discussed in the earlier section, you should avoid reaching zero).

Media 13: setting the correct gain staging on the Zoom L-8

Media 14: the audio meter in OBS
You are on your way to getting a great sounding livestream. Next you can process the audio using various audio processing capabilities through the mixer and/or within OBS such as adding equalization, compressors, reverb, delay, and much more. The Zoom L-8 allows adjustments to each individual channel. It also comes with global effects such as reverb and delay. Inside the computer one can apply a global effect on the stereo channel inside Open Broadcaster Software (OBS)—within OBS these options are called “Filters”.
The application and potential of each effect is far beyond the scope of this article. However we would like to point out one important audio effect to consider which is called a limiter. If used correctly it can boost the volume of the music while avoiding distortion. This is useful in this time given that a lot of the livestreaming audience view content on their mobile devices which do not have loud speakers. Also musical genres such as classical music have a wide dynamic range and the softest parts of the music might get buried if the general level is not brought up on the broadcasting end. Usually this effect is put on at the very end of the audio chain before audio is transmitted to the world. In the realm of digital audio, there is a virtual ceiling beyond which a loud signal becomes distorted and altered. In very simple terms, a limiter puts a barrier on this ceiling and automatically brings down any audio that would go beyond it.
OBS comes with a built-in limiter. The limiter can be extended with a third-party plug-in that uses the VST-2 format. Media 15 shows how to navigate and get to the limiter. We recommend setting the value to -1dB. This will ensure that no audio can go past this number and get distorted.

Media 15: using the Limiter audio process in OBS
You will need to set the compression quality of the audio before being sent out to your audience. Consider the sound of MP3s compared to the quality of Audio-CDs: the higher the bitrate the better it will sound, but you will need a faster internet connection to allow for higher quality. We recommend starting with the highest number possible (320).

Media 16: setting the audio bitrate quality in OBS
Have fun and test test test before your main event. Many of these platforms allow you to stream to a private or unlisted destination which means you do not have to make all of your troubleshooting public! You can have friends and associates listen to your test streams in order to ensure that the performance is sounding good, and that you can replicate those conditions when it comes to the big show.
Another tip: when you are finally streaming to the public you will likely receive comments from viewers. You should be skeptical of negative comments on sound if it is just one person making them as their system might be the issue and not yours.
Conclusion
We hope that this article has been helpful and that it provides at the very least the groundwork for you to explore this topic further. Audio production and live audio are deep topics and you can devote years to learning and refining your techniques. Audio production can get complicated, but remain patient. We live in truly extraordinary times and there is a wealth of knowledge in our communities and online.
Dig in and try out some of these methods. As we mention, they will require a lot of trial and error and testing.
Thinking more broadly about the world we inhabit and the culture we embody as artists, it is not fair to expect everyone to suddenly master all of these techniques, nor should every artist purchase a lot of equipment (especially when the usual financial model that we depend on for income is dormant and unavailable to us). This is not the expectation. We can find other solutions to help us through the next year as social distancing might allow for small gatherings of collaborating artists and technicians while prohibiting/limiting in-person audiences.
If your livestream is being presented by an organization, indicate some of the technical costs that are required and ask that they compensate you for those added costs. Apart from equipment like microphones and mixers, internet capacity is a major factor. Many of us have wireless/wifi that is insufficient for uploading live video. Tell your presenting organization that you would like to include the cost for upgrading your internet connection as part of your fee in order to ensure a higher quality stream. You can also consider short-term equipment rental from businesses like Long & McQuade, or pay to rent gear from some of your colleagues.
Let’s remember the reasons that we have venues, publicly funded presenters, and festivals. Let’s remember why we have a collaborative model for event production with a division of skills/labour. We want to value and celebrate the various specializations that combine to define a music community. In the same way that we invest in social programs like health, education, and transit, we should look forward to reclaiming and (re)building those collective spaces that foster the art making that we love.
While we adjust to the evolving realities and implications of social distancing, don’t hesitate to reach out and when you have the means, hire the audio engineers in your scene.
Endnotes
1 “Shure SM58 | RecordingHacks.com.” http://recordinghacks.com/microphones/Shure/SM58. Accessed 16 Apr. 2020.
2 “Can You Use an iPhone’s Internal Microphone for Acoustic ….” 22 Mar. 2019, https://signalessence.com/can-you-use-an-iphones-internal-microphone-for-acoustic-testing-and-accurate-recordings/. Accessed 16 Apr. 2020.
3 “4006 Omnidirectional Microphone – DPA Microphones.” https://www.dpamicrophones.com/pencil/4006-omnidirectional-microphone. Accessed 16 Apr. 2020.
4 “Audio recording for live events – Epiphan Video.” https://www.epiphan.com/solutions/audio-recording-for-live-events/. Accessed 17 Apr. 2020.
5 “Open Broadcaster Software – Wikipedia.” https://en.wikipedia.org/wiki/Open_Broadcaster_Software. Accessed 17 Apr. 2020.
6 “Gain Structure 101 – miniDSP.” https://www.minidsp.com/applications/dsp-basics/gain-structure-101. Accessed 18 Apr. 2020.